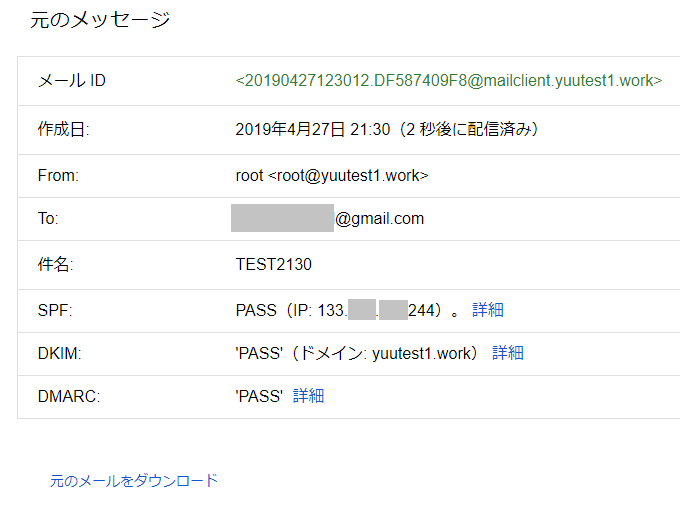
Gmailでソースを確認するとSPF, DKIM, DMARCが「PASS」になっている。
設定OK!
もくじ
送信認証技術は3つあります。
- SPF
- DKIM
- DMARC
// DMARCを設定するにはSPF, DKIMを実装している必要がある。
こちらをちゃんと設定していくといった内容になります。
また1台ではなく、メールサーバはゲートウェイサーバを利用したリレーを行う設定といった内容です。
前提条件
- OS:CentOS7
- プラットフォーム:ConoHa
サーバ構成
- ゲートウェイサーバ(中継サーバ)
IP:111.111.111.111
ホスト:mailds1.yuulinux.tokyo - クライアントサーバ
IP.222.222.222.222
ホスト:mailclient.yuutest1.work
上記の構成で、正引き、逆引きIP設定を行っておくこと
動作
- クライアントメールサーバから送信を行う
- クライアントメールサーバがゲートウェイサーバにリレーする
- ゲートウェイサーバがメールを受け取り、宛先メールアドレスに送信する
宛先メールアドレスにGmailのアドレスを指定して、ソースを見ることで設定の正しさを確認する
メールゲートウェイ mailds1.yuulinux.tokyo
Firewalld設定
systemctl enable firewalld
systemctl restart firewalld
systemctl status firewalld

firewall-cmd --add-port=55522/tcp --zone=public --permanent
firewall-cmd --add-port=80/tcp --zone=public --permanent
firewall-cmd --add-port=443/tcp --zone=public --permanent
firewall-cmd --add-port=25/tcp --zone=public --permanent
firewall-cmd --add-port=587/tcp --zone=public --permanent
firewall-cmd --add-port=465/tcp --zone=public --permanent
firewall-cmd --reload
# hostnamectl set-hostname mailds1.yuulinux.tokyo
# vi /etc/hosts

127.0.0.1   mailds1.yuulinux.tokyo localhost localhost.localdomain localhost4 localhost4.localdomain4
::1         localhost6 localhost6.localdomain6
# vi /etc/sysconfig/network

NETWORKING=yes
NOZEROCONF=yes

※下記を追加

HOSTNAME=mailds1.yuulinux.tokyo
Let’s Encrypt
yum install -y git
cd /usr/local/src
git clone https://github.com/certbot/certbot
cd certbot/
./certbot-auto certonly --standalone -d mailds1.yuulinux.tokyo -m hoge@example.com --agree-tos -n
自動更新
# vi /etc/crontab

SHELL=/bin/bash
PATH=/sbin:/bin:/usr/sbin:/usr/bin
MAILTO=''

# For details see man 4 crontabs

# Example of job definition:
# .---------------- minute (0 - 59)
# |  .------------- hour (0 - 23)
# |  |  .---------- day of month (1 - 31)
# |  |  |  .------- month (1 - 12) OR jan,feb,mar,apr ...
# |  |  |  |  .---- day of week (0 - 6) (Sunday=0 or 7) OR sun,mon,tue,wed,thu,fri,sat
# |  |  |  |  |
# *  *  *  *  * user-name  command to be executed

# 証明書を更新
0 4 1 * * root /usr/local/src/certbot/certbot-auto renew --force-renewal
# systemctl restart crond
# yum install -y postfix cyrus-sasl-plain cyrus-sasl-md5 cyrus-sasl
バックアップ
# cp /etc/postfix/main.cf /etc/postfix/main.cf.org
設定を行う
# vi /etc/postfix/main.cf


#myhostname = host.domain.tld
#myhostname = virtual.domain.tld
myhostname = mailds1.yuulinux.tokyo


#mydomain = domain.tld
mydomain = yuulinux.tokyo


#myorigin = $myhostname
#myorigin = $mydomain
myorigin = $mydomain


#inet_interfaces = all
#inet_interfaces = $myhostname
#inet_interfaces = $myhostname, localhost
#inet_interfaces = localhost
inet_interfaces = all


#inet_protocols = all
inet_protocols = ipv4


#mynetworks = 168.100.189.0/28, 127.0.0.0/8
#mynetworks = $config_directory/mynetworks
#mynetworks = hash:/etc/postfix/network_table
mynetworks = 127.0.0.0/8 111.111.111.111/32 ←●リレー許可をするメールサーバ


#smtpd_banner = $myhostname ESMTP $mail_name
#smtpd_banner = $myhostname ESMTP $mail_name ($mail_version)
smtpd_banner = $myhostname ESMTP unknown


※最終行に追加

# リレー制御 ※送信元サーバの逆引き、ホスト名等しっかり行われているか要確認
smtpd_relay_restrictions =
    reject_unknown_sender_domain,
    reject_non_fqdn_sender,
    reject_unknown_client,
    permit_mynetworks,
    reject


# TLS
smtp_use_tls = yes
smtp_tls_security_level = may
smtp_tls_loglevel = 1
#smtp_tls_received_header = yes
smtpd_tls_cert_file = /etc/letsencrypt/live/mailds1.yuulinux.tokyo/fullchain.pem
smtpd_tls_key_file = /etc/letsencrypt/live/mailds1.yuulinux.tokyo/privkey.pem
smtpd_tls_session_cache_database = btree:/var/lib/postfix/smtpd_scache
smtpd_tls_session_cache_timeout = 3600s

# DKIM
smtpd_milters = inet:127.0.0.1:8891
non_smtpd_milters = $smtpd_milters
milter_default_action = accept
編集前バックアップ
# cp /etc/postfix/master.cf /etc/postfix/master.cf.org
# vi /etc/postfix/master.cf


smtp      inet  n       -       n       -       -       smtpd
#smtp      inet  n       -       n       -       1       postscreen
#smtpd     pass  -       -       n       -       -       smtpd
#dnsblog   unix  -       -       n       -       0       dnsblog
#tlsproxy  unix  -       -       n       -       0       tlsproxy
#submission inet n       -       n       -       -       smtpd
#  -o syslog_name=postfix/submission
#  -o smtpd_tls_security_level=encrypt
#  -o smtpd_sasl_auth_enable=yes
#  -o smtpd_reject_unlisted_recipient=no
#  -o smtpd_client_restrictions=$mua_client_restrictions
#  -o smtpd_helo_restrictions=$mua_helo_restrictions
#  -o smtpd_sender_restrictions=$mua_sender_restrictions
#  -o smtpd_recipient_restrictions=permit_sasl_authenticated,reject
#  -o milter_macro_daemon_name=ORIGINATING
smtps     inet  n       -       n       -       -       smtpd ←●有効化
#  -o syslog_name=postfix/smtps
  -o smtpd_tls_wrappermode=yes   ←●有効化
#  -o smtpd_sasl_auth_enable=yes
#  -o smtpd_reject_unlisted_recipient=no
#  -o smtpd_client_restrictions=$mua_client_restrictions
#  -o smtpd_helo_restrictions=$mua_helo_restrictions
#  -o smtpd_sender_restrictions=$mua_sender_restrictions
#  -o smtpd_recipient_restrictions=permit_sasl_authenticated,reject
#  -o milter_macro_daemon_name=ORIGINATING
#628       inet  n       -       n       -       -       qmqpd
pickup    unix  n       -       n       60      1       pickup
cleanup   unix  n       -       n       -       0       cleanup


tlsmgr    unix  -       -       n       1000?   1       tlsmgr ←●有効であることを確認
DKIM認証
# yum -y install epel-release
# yum -y install opendkim
cd /etc/opendkim/keys/
mkdir yuulinux.tokyo
cd yuulinux.tokyo
opendkim-genkey -d yuulinux.tokyo -s selector
chown opendkim:opendkim *
chmod 440 *.private
ここのドメインはゲートウェイサーバのネイキッドドメインを指定すれば問題ない。
mailds1.yuulinux.tokyoならyuulinux.tokyoを指定する。
# cp /etc/opendkim.conf /etc/opendkim.conf.org
# vi /etc/opendkim.conf


Mode    v

↓変更(デフォルトは受信時のみ確認、送信時も確認するようにする)

#Mode   v
Mode    sv


##  Domain(s) whose mail should be signed by this filter. Mail from other domains will
##  be verified rather than being signed. Uncomment and use your domain name.
##  This parameter is not required if a SigningTable is in use.
# Domain        example.com
Domain * ←●追加


Selector        default

↓変更(セレクタ名を指定)

#Selector       default
Selector selector


KeyFile /etc/opendkim/keys/default.private

↓変更(署名に使う秘密鍵の場所)

#KeyFile        /etc/opendkim/keys/default.private
KeyFile /etc/opendkim/keys/yuulinux.tokyo/selector.private


Socket  inet:8891@localhost

↓変更

#Socket inet:8891@localhost
Socket inet:8891@127.0.0.1
# vi /etc/opendkim/SigningTable

※下記を追加

*@* selector._domainkey.yuulinux.tokyo
認証を行わないサーバを設定
# vi /etc/opendkim/TrustedHosts

127.0.0.1
::1
# vi /etc/sysconfig/opendkim


# Set the necessary startup options
OPTIONS="-x /etc/opendkim.conf -P /var/run/opendkim/opendkim.pid"

# Set the default DKIM selector
DKIM_SELECTOR=default

# Set the default DKIM key location
DKIM_KEYDIR=/etc/opendkim/keys


※下記を追加

AUTOCREATE_DKIM_KEYS=NO
1台の場合はここでおしまい。
今回はメールゲートウェイで、リレーするクライアントがあるのでまだ設定が必要
# vi /etc/opendkim.conf

##  Identifies a set of "external" hosts that may send mail through the server as one
##  of the signing domains without credentials as such.
# ExternalIgnoreList    refile:/etc/opendkim/TrustedHosts
ExternalIgnoreList    refile:/etc/opendkim/TrustedHosts ←●追加

##  Identifies a set "internal" hosts whose mail should be signed rather than verified.
# InternalHosts refile:/etc/opendkim/TrustedHosts
InternalHosts refile:/etc/opendkim/InternalHosts ←●追加
送信時に必ず認証するサーバを設定
# vi /etc/opendkim/InternalHosts

0.0.0.0/0
反映を行います。
postfix check
systemctl restart postfix
systemctl enable postfix
systemctl status postfix

systemctl restart opendkim
systemctl enable opendkim
systemctl status opendkim
メールのログロテーション
たくさんのメールを中継するのでログがいっぱいにならないようにロテート設定を指定する
# vi /etc/logrotate.d/syslog


/var/log/cron
/var/log/secure
/var/log/spooler
/var/log/messages
{
    missingok
    sharedscripts
    postrotate
        /bin/kill -HUP `cat /var/run/syslogd.pid 2> /dev/null` 2> /dev/null || true
    endscript
}

/var/log/maillog
{
    daily
    size 1G
    rotate 14
    create
    dateext
    dateformat .%Y%m%d
    compress
    ifempty
    missingok
    sharedscripts
    postrotate
        /bin/kill -HUP `cat /var/run/syslogd.pid 2> /dev/null` 2> /dev/null || true
    endscript
}
テスト
# logrotate -d /etc/logrotate.d/syslog
手動強制実行
# logrotate -f /etc/logrotate.conf
ロテートされたかを確認
# ls

amazon             btmp                   cron                httpd        maillog.20190320.gz  secure            wtmp
audit              btmp-20190320          cron-20190320       journal      messages             secure-20190320   wtmp-20190320
boot.log           chrony                 dmesg               lastlog      ntpstats             spooler           yum.log
boot.log-20190319  cloud-init.log         dmesg.old           letsencrypt  php-fpm              spooler-20190320  yum.log-20190320
boot.log-20190320  cloud-init-output.log  grubby_prune_debug  maillog      sa                   tallylog
# vi /etc/crontab

SHELL=/bin/bash
PATH=/sbin:/bin:/usr/sbin:/usr/bin
MAILTO=""

# For details see man 4 crontabs

# Example of job definition:
# .---------------- minute (0 - 59)
# |  .------------- hour (0 - 23)
# |  |  .---------- day of month (1 - 31)
# |  |  |  .------- month (1 - 12) OR jan,feb,mar,apr ...
# |  |  |  |  .---- day of week (0 - 6) (Sunday=0 or 7) OR sun,mon,tue,wed,thu,fri,sat
# |  |  |  |  |
# *  *  *  *  * user-name  command to be executed

# 証明書を更新
0 4 1 * * root /usr/local/src/certbot/certbot-auto renew --force-renewal

# ログロテート実行/6時間毎
0 */6 * * * root /usr/sbin/logrotate -f /etc/logrotate.conf
反映させる
# systemctl restart crond
署名を確認する
# cat /etc/opendkim/keys/yuulinux.tokyo/selector.txt

selector._domainkey     IN      TXT     ( "v=DKIM1; k=rsa; "
          "p=MIGfMA0GCSqGSIb3DQEBAQUAA4GNADCBiQKBgQCXhQC4FhlXtN74v4ugmz2ox6gWfGZ2SycpnLwwqIXTkXSDjoj1l9RyFNDNu2Awi3ieZlK0yi+jcCtcenO0gd/9ZA43kL4cZerciBf4syGsIycaLb1r32hfaN3IawN9oq4zZOCOD0Q7lbKa+P3fFMDkPdRiMIxioz4GSNP8mnqYuwIDAQAB" )  ; ----- DKIM key selector for yuulinux.tokyo
mailds1.yuulinux.tokyo
VALUE DOMAINで設定する場合のDNSレコード
a mailds1 111.111.111.111
txt @ v=spf1 +a +mx +ip4:111.111.111.111 ~all
txt selector._domainkey txt v=DKIM1; k=rsa; p=MIGfMA0GCSqGSIb3DQEBAQUAA4GNADCBiQKBgQCXhQC4FhlXtN74v4ugmz2ox6gWfGZ2SycpnLwwqIXTkXSDjoj1l9RyFNDNu2Awi3ieZlK0yi+jcCtcenO0gd/9ZA43kL4cZerciBf4syGsIycaLb1r32hfaN3IawN9oq4zZOCOD0Q7lbKa+P3fFMDkPdRiMIxioz4GSNP8mnqYuwIDAQAB
txt _dmarc v=DMARC1; p=none; pct=100;
●解説
※メールゲートウェイホスト mailds1.yuulinux.tokyo
a mailds1 111.111.111.111

※SPF
txt @ v=spf1 +a +mx +ip4:111.111.111.111 ~all

※DKIM
txt selector._domainkey txt v=DKIM1; k=rsa; p=MIGfMA0GCSqGSIb3DQEBAQUAA4GNADCBiQKBgQCXhQC4FhlXtN74v4ugmz2ox6gWfGZ2SycpnLwwqIXTkXSDjoj1l9RyFNDNu2Awi3ieZlK0yi+jcCtcenO0gd/9ZA43kL4cZerciBf4syGsIycaLb1r32hfaN3IawN9oq4zZOCOD0Q7lbKa+P3fFMDkPdRiMIxioz4GSNP8mnqYuwIDAQAB

※DMARC
txt _dmarc v=DMARC1; p=none; pct=100;
- p=none;
何も指定しない、受信側サーバの判断で処理している貰うように指定。 - p=quarantine;
隔離。soft failとなり、迷惑メールフォルダなどに振り分けられる。 - p=reject;
拒否。受信側サーバに受け取りを拒否して貰う。
// DKIM, DMARCのAレコードは必要ありません。
集計レポートアドレスの設定を行う場合
rua=mailto:dmarc.rua@example.com; ruf=mailto:dmarc.rua@example.com
集計用メールアドレスを追加する場合、厳重に管理できるメールアドレスを指定する。
例)
txt _dmarc v=DMARC1; p=none; pct=100; rua=mailto:dmarc.rua@example.com; ruf=mailto:dmarc.rua@example.com
Route53で設定する場合のDNSレコード
mailds1.yuulinux.tokyo.
A
111.111.111.111


yuulinux.tokyo.
TXT
"v=spf1 +a +mx +ip4:133.130.111.244 ~all"


selector._domainkey.yuulinux.tokyo.
TXT
"v=DKIM1; k=rsa; " "p=MIGfMA0GCSqGSIb3DQEBAQUAA4GNADCBiQKBgQCXhQC4FhlXtN74v4ugmz2ox6gWfGZ2SycpnLwwqIXTkXSDjoj1" "l9RyFNDNu2Awi3ieZlK0yi+jcCtcenO0gd/9ZA43kL4cZerciBf4syGsIycaLb1r32hfaN3IawN9oq4zZOCOD0Q7lbKa+P3fFMDkPdRiMIxioz4GSNP8mnqYuwIDAQAB"


_dmarc.yuulinux.tokyo.
TXT
"v=DMARC1; p=none; pct=100;"
クライアント メールサーバ mailclient.yuutest1.work
クライアントサーバ mailclient.yuutest1.work
VALUE DOMAINで設定する場合のDNSレコード
a @ 222.222.222.222
a mailclient 222.222.222.222

txt @ v=spf1 +a +mx +ip4:111.111.111.111 ~all
txt selector._domainkey txt v=DKIM1; k=rsa; p=MIGfMA0GCSqGSIb3DQEBAQUAA4GNADCBiQKBgQCXhQC4FhlXtN74v4ugmz2ox6gWfGZ2SycpnLwwqIXTkXSDjoj1l9RyFNDNu2Awi3ieZlK0yi+jcCtcenO0gd/9ZA43kL4cZerciBf4syGsIycaLb1r32hfaN3IawN9oq4zZOCOD0Q7lbKa+P3fFMDkPdRiMIxioz4GSNP8mnqYuwIDAQAB
txt _dmarc v=DMARC1; p=none; pct=100;
p=none;は何もしない。p=quarantine;にすると隔離。
Route53で設定する場合のDNSレコード
yuutest1.work.
A
222.222.222.222


mailclient.yuutest1.work.
A
222.222.222.222


selector._domainkey.yuutest1.work.
TXT
"v=DKIM1; k=rsa; " "p=MIGfMA0GCSqGSIb3DQEBAQUAA4GNADCBiQKBgQCXhQC4FhlXtN74v4ugmz2ox6gWfGZ2SycpnLwwqIXTk" "XSDjoj1l9RyFNDNu2Awi3ieZlK0yi+jcCtcenO0gd/9ZA43kL4cZerciBf4syGsIycaLb1r32hfaN3IawN9oq4zZOCOD0Q7lbKa+P3fFMDkPdRiMIxioz4GSNP8mnqYuwIDAQAB"


_dmarc.yuutest1.work.
TXT
"v=DMARC1; p=none; pct=100;"
Firewalld
systemctl enable firewalld
systemctl restart firewalld
systemctl status firewalld

firewall-cmd --add-port=55522/tcp --zone=public --permanent
firewall-cmd --add-port=80/tcp --zone=public --permanent
firewall-cmd --add-port=443/tcp --zone=public --permanent
firewall-cmd --add-port=25/tcp --zone=public --permanent
firewall-cmd --add-port=587/tcp --zone=public --permanent
firewall-cmd --add-port=465/tcp --zone=public --permanent
firewall-cmd --reload
# hostnamectl set-hostname mailclient.yuutest1.work
# vi /etc/hosts

127.0.0.1   mailclient.yuutest1.work localhost localhost.localdomain localhost4 localhost4.localdomain4
::1         localhost6 localhost6.localdomain6
# vi /etc/sysconfig/network

NETWORKING=yes
NOZEROCONF=yes

※下記を追加

HOSTNAME=mailclient.yuutest1.work
Let’s Encrypt
yum install -y git
cd /usr/local/src
git clone https://github.com/certbot/certbot
cd certbot/
./certbot-auto certonly --standalone -d mailclient.yuutest1.work -m hoge@example.net --agree-tos -n
自動更新
# vi /etc/crontab

SHELL=/bin/bash
PATH=/sbin:/bin:/usr/sbin:/usr/bin
MAILTO=''

# For details see man 4 crontabs

# Example of job definition:
# .---------------- minute (0 - 59)
# |  .------------- hour (0 - 23)
# |  |  .---------- day of month (1 - 31)
# |  |  |  .------- month (1 - 12) OR jan,feb,mar,apr ...
# |  |  |  |  .---- day of week (0 - 6) (Sunday=0 or 7) OR sun,mon,tue,wed,thu,fri,sat
# |  |  |  |  |
# *  *  *  *  * user-name  command to be executed

# 証明書を更新
0 4 1 * * root /usr/local/src/certbot/certbot-auto renew --force-renewal
# systemctl restart crond
# yum install -y postfix cyrus-sasl-plain cyrus-sasl-md5 cyrus-sasl
# cp /etc/postfix/main.cf /etc/postfix/main.cf.org
# vi /etc/postfix/main.cf


#myhostname = host.domain.tld
#myhostname = virtual.domain.tld
myhostname = mailclient.yuutest1.work


#mydomain = domain.tld
mydomain = yuutest1.work

#myorigin = $myhostname
#myorigin = $mydomain
myorigin = $mydomain


#inet_interfaces = all
#inet_interfaces = $myhostname
#inet_interfaces = $myhostname, localhost
#inet_interfaces = localhost
inet_interfaces = all


#inet_protocols = all
inet_protocols = ipv4


#relayhost = $mydomain
#relayhost = [gateway.my.domain]
#relayhost = [mailserver.isp.tld]
#relayhost = uucphost
#relayhost = [an.ip.add.ress]
relayhost = [mailds1.yuulinux.tokyo]


# SMTP認証
smtpd_sasl_auth_enable = yes
broken_sasl_auth_clients = yes
smtpd_recipient_restrictions = permit_sasl_authenticated, reject_unauth_destination


# TLS
smtp_use_tls = yes
smtp_tls_security_level = may
smtp_tls_loglevel = 1
smtpd_tls_received_header = yes
smtpd_tls_cert_file = /etc/letsencrypt/live/mailclient.yuutest1.work/fullchain.pem
smtpd_tls_key_file  = /etc/letsencrypt/live/mailclient.yuutest1.work/privkey.pem
smtpd_tls_session_cache_database = btree:/var/lib/postfix/smtpd_scache
smtpd_tls_session_cache_timeout = 3600s
編集前バックアップ
# cp /etc/postfix/master.cf /etc/postfix/master.cf.org
# vi /etc/postfix/master.cf


#smtp      inet  n       -       n       -       -       smtpd ←●無効化
#smtp      inet  n       -       n       -       1       postscreen
#smtpd     pass  -       -       n       -       -       smtpd
#dnsblog   unix  -       -       n       -       0       dnsblog
#tlsproxy  unix  -       -       n       -       0       tlsproxy
submission inet n       -       n       -       -       smtpd  ←●有効化
#  -o syslog_name=postfix/submission
#  -o smtpd_tls_security_level=encrypt
  -o smtpd_sasl_auth_enable=yes  ←●有効化
#  -o smtpd_reject_unlisted_recipient=no
#  -o smtpd_client_restrictions=$mua_client_restrictions
#  -o smtpd_helo_restrictions=$mua_helo_restrictions
#  -o smtpd_sender_restrictions=$mua_sender_restrictions
  -o smtpd_recipient_restrictions=permit_sasl_authenticated,reject  ←●有効化
#  -o milter_macro_daemon_name=ORIGINATING
smtps     inet  n       -       n       -       -       smtpd   ←●有効化
#  -o syslog_name=postfix/smtps
  -o smtpd_tls_wrappermode=yes   ←●有効化
  -o smtpd_sasl_auth_enable=yes   ←●有効化
#  -o smtpd_reject_unlisted_recipient=no
#  -o smtpd_client_restrictions=$mua_client_restrictions
#  -o smtpd_helo_restrictions=$mua_helo_restrictions
#  -o smtpd_sender_restrictions=$mua_sender_restrictions
  -o smtpd_recipient_restrictions=permit_sasl_authenticated,reject   ←●有効化
#  -o milter_macro_daemon_name=ORIGINATING
#628       inet  n       -       n       -       -       qmqpd
pickup    unix  n       -       n       60      1       pickup
cleanup   unix  n       -       n       -       0       cleanup


tlsmgr    unix  -       -       n       1000?   1       tlsmgr ←●有効であることを確認
# vi /etc/sasl2/smtpd.conf


pwcheck_method: saslauthd
mech_list: plain login

↓変更

#pwcheck_method: saslauthd
#mech_list: plain login

pwcheck_method: saslauthd
mech_list: plain login cram-md5
# saslpasswd2 -u yuutest1.work send

Password:<パスワード>
Again (for verification):<パスワード>
- ユーザ:send@yuutest1.work
- パスワード:<パスワード>
上記設定になります。
# chown postfix /etc/sasldb2
反映を行います。
postfix check
systemctl restart postfix
systemctl enable postfix
systemctl status postfix

systemctl restart saslauthd
systemctl enable saslauthd
systemctl status saslauthd
送信テスト
-rオプションをつけるとFromアドレスを指定できます。
送信を行う
# echo "THIS IS TEST20190429-1940"| mail -s "TEST MAIL" -r fromUser@yuutest1.work toUser@gmail.com
SPF, DKIM, DMARCについてすべてPASSしてたら大丈夫。
お疲れ様です。
関連記事 - More from my site -
 Postfix DKIM, SPF, 送信暗号化, 逆引き
 SPF設定 DKIM 送信する為の技術
 Postfix Untrusted TLS connection established to aspmx.l.google.com
 Postfix キャリア向けにメール送信量を調整する
 PostfixSMTP+MySQL+Laravel+CentOS
- メールサーバがブラックリストに載る理由
 送信リレー用メールサーバ構築 Postfix
- PostfixでSMTPサーバとしてGmailサーバを経由して送信する
 Postfix+Dovecot+Apache+MySQL+PostfixAdmin
![Plesk12.5.30 25番で待ちうけさせる status=deferred (connect to example.com[111.xxx.yyy.2]:25: Connection refused)](https://www.yuulinux.tokyo/contents/wp-content/uploads/2017/10/plesk25_201710027_2-150x150.jpg) Plesk12.5.30 25番で待ちうけさせる status=deferred (connect to example.com[111.xxx.yyy.2]:25: Connection refused)
Plesk12.5.30 25番で待ちうけさせる status=deferred (connect to example.com[111.xxx.yyy.2]:25: Connection refused) Plain認証でのPostfix+Dovecot+セカンダリメールサーバ
 WEBサーバ用Postfix設定
 SASL認証 コマンドでのログイン確認
 Postfix キューの削除