オンプレ利用のゆるい設定です。
- ruby2.6
- redmine-4.0.3
80番, 443番を開けます。
firewall-cmd --zone=public --add-port=80/tcp --permanent
firewall-cmd --zone=public --add-port=443/tcp --permanent
firewall-cmd --reload
yumで必要なものをインストール
yum -y groupinstall "base" "Development tools"
yum -y install openssl-devel readline-devel zlib-devel curl-devel libyaml-devel libffi-devel
yum -y install postgresql-server postgresql-devel
yum -y install httpd httpd-devel
yum -y install ImageMagick ImageMagick-devel ipa-pgothic-fonts
yum -y install mysql-devel
ruby2.6.2のインストール
# wget https://cache.ruby-lang.org/pub/ruby/2.6/ruby-2.6.2.tar.gz
# tar zxvf ruby-*.tar.gz
# cd ruby-*
# ./configure --disable-install-doc
# make
# make install
# ruby -v
ruby 2.6.2p47 (2019-03-13 revision 67232) [x86_64-linux]
gemのbundlerのインストール
# gem install bundler
もくじ
PostgreSQLセットアップ
初期化
# postgresql-setup initdb
# vi /var/lib/pgsql/data/pg_hba.conf


・・・

※最終行付近を下記のようにする

# TYPE  DATABASE        USER            ADDRESS                 METHOD

# "local" is for Unix domain socket connections only
local   all             all                                     peer
# IPv4 local connections:
host    all             all             127.0.0.1/32            password ←●passwordに変更
# IPv6 local connections:
host    all             all             ::1/128                 password ←●passwordに変更
# Allow replication connections from localhost, by a user with the
# replication privilege.
#local   replication     postgres                                peer
#host    replication     postgres        127.0.0.1/32            ident
#host    replication     postgres        ::1/128                 ident

※●下記を追加

host    redmine         redmine         ::1/128                  password
host    redmine         redmine         127.0.0.1/32             password
反映させる
systemctl restart postgresql
systemctl enable postgresql
systemctl status postgresql
# sudo adduser redmine
# sudo -u postgres createuser -P redmine


新しいロールのためのパスワード:※「redminepass」を入力
もう一度入力してください:※「redminepass」を入力
# cd /var/lib/pgsql
# sudo -u postgres createdb -E UTF-8 -l ja_JP.UTF-8 -O redmine -T template0 redmine
ユーザ確認
# su - postgres
最終ログイン: 2019/04/02 (火) 16:11:03 JST日時 pts/0


-bash-4.2$ psql -l
                                         データベース一覧
   名前    |  所有者  | エンコーディング |  照合順序   | Ctype(変換演算子) |      アクセス権
-----------+----------+------------------+-------------+-------------------+-----------------------
 postgres  | postgres | UTF8             | ja_JP.UTF-8 | ja_JP.UTF-8       |
 redmine   | redmine  | UTF8             | ja_JP.UTF-8 | ja_JP.UTF-8       |
 template0 | postgres | UTF8             | ja_JP.UTF-8 | ja_JP.UTF-8       | =c/postgres          +
           |          |                  |             |                   | postgres=CTc/postgres
 template1 | postgres | UTF8             | ja_JP.UTF-8 | ja_JP.UTF-8       | =c/postgres          +
           |          |                  |             |                   | postgres=CTc/postgres
(4 行)


-bash-4.2$ exit
ログアウト
Redmineのインストール
# cd
# wget http://www.redmine.org/releases/redmine-4.0.3.zip
# unzip redmine-4.0.3.zip
# mv redmine-4.0.3 /var/lib/redmine
# cp /var/lib/redmine/config/database.yml.example /var/lib/redmine/config/database.yml
# vi /var/lib/redmine/config/database.yml


・・・

production:
  adapter: mysql2
  database: redmine
  host: localhost
  username: root
  password: ""
  encoding: utf8

↓変更

production:
  adapter: postgresql
  database: redmine
  host: localhost
  username: redmine
  password: "redminepass"
  encoding: utf8


・・・
# cp /var/lib/redmine/config/configuration.yml.example /var/lib/redmine/config/configuration.yml
# vi /var/lib/redmine/config/configuration.yml

production:

↓変更

production:
  email_delivery:
    delivery_method: :smtp
    smtp_settings:
      address: <メールサーバホスト名>
      port: 587
      domain: <メールサーバホスト名>
      authentication: :login
      user_name: <メールユーザ>
      password: <メールパスワード>
      enable_starttls_auto:
  rmagick_font_path: /usr/share/fonts/ipa-pgothic/ipagp.ttf
# cd /var/lib/redmine/
※rootで実行してはいけないもののようですが、外部には公開しないので。
# bundle install --without development test --path vendor/bundle
初期設定
# bundle exec rake generate_secret_token
# RAILS_ENV=production bundle exec rake db:migrate
# RAILS_ENV=production REDMINE_LANG=ja bundle exec rake redmine:load_default_data

Default configuration data loaded.
これが出たらOK!
# gem install passenger
# passenger-install-apache2-module --auto --languages ruby
# passenger-install-apache2-module --snippet


LoadModule passenger_module /usr/local/lib/ruby/gems/2.6.0/gems/passenger-6.0.2/buildout/apache2/mod_passenger.so
<IfModule mod_passenger.c>
  PassengerRoot /usr/local/lib/ruby/gems/2.6.0/gems/passenger-6.0.2
  PassengerDefaultRuby /usr/local/bin/ruby
</IfModule>
出力結果をメモに控える
# vi /etc/httpd/conf.d/redmine.conf


<Directory "/var/lib/redmine/public">
  Require all granted
</Directory>

# passenger-install-apache2-module --snippet で表示された設定を記述。
LoadModule passenger_module /usr/local/lib/ruby/gems/2.6.0/gems/passenger-6.0.2/buildout/apache2/mod_passenger.so
<IfModule mod_passenger.c>
  PassengerRoot /usr/local/lib/ruby/gems/2.6.0/gems/passenger-6.0.2
  PassengerDefaultRuby /usr/local/bin/ruby
</IfModule>

# 必要に応じてPassengerのチューニングのための設定を追加(任意)。
# 詳しくはPhusion Passenger users guide(https://www.phusionpassenger.com/library/config/apache/reference/)参照。
PassengerMaxPoolSize 20
PassengerMaxInstancesPerApp 4
PassengerPoolIdleTime 864000
PassengerStatThrottleRate 10

Header always unset "X-Powered-By"
Header always unset "X-Runtime"
# vi /etc/httpd/conf/httpd.conf


#DocumentRoot "/var/www/html"
DocumentRoot "/var/lib/redmine/public"
# chown -R apache:apache /var/lib/redmine
systemctl restart httpd
systemctl enable httpd
systemctl status httpd
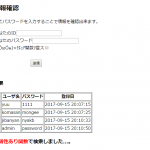
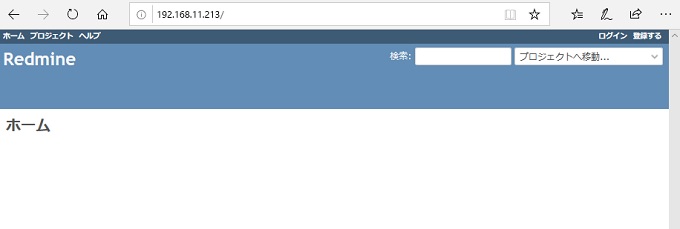
http://IPアドレス/
- ユーザ:admin
- パスワード:admin
ここでおしまい。
ドメインアクセスでの設定をする
- IPでのアクセスを禁止する。
- サブディレクトリでの公開を行う
- HTTPSに対応する
 vi /etc/httpd/conf.d/redmine.conf


<Directory "/var/lib/redmine/public">
  Require all granted
</Directory>

# passenger-install-apache2-module --snippet で表示された設定を記述。
LoadModule passenger_module /usr/local/lib/ruby/gems/2.6.0/gems/passenger-6.0.2/buildout/apache2/mod_passenger.so
<IfModule mod_passenger.c>
  PassengerRoot /usr/local/lib/ruby/gems/2.6.0/gems/passenger-6.0.2
  PassengerDefaultRuby /usr/local/bin/ruby
</IfModule>

# 必要に応じてPassengerのチューニングのための設定を追加(任意)。
# 詳しくはPhusion Passenger users guide(https://www.phusionpassenger.com/library/config/apache/reference/)参照。
PassengerMaxPoolSize 20
PassengerMaxInstancesPerApp 4
PassengerPoolIdleTime 864000
PassengerStatThrottleRate 10

Header always unset "X-Powered-By"
Header always unset "X-Runtime"
# vi /etc/httpd/conf.d/app.example.com.conf


<VirtualHost *:80>
  DocumentRoot /var/www/vhosts/app.example.com
  ServerName app.example.com

  <Directory "/var/lib/redmine/public">
    Require all granted
    Allowoverride All
  </Directory>


</VirtualHost>
# vi /etc/httpd/conf/httpd.conf


<IfModule dir_module>
    DirectoryIndex index.php index.html ←●DirectooryIndexにindex.phpを加える
</IfModule>


※最終行に追加
# Apache version Hide
ServerTokens ProductOnly
ServerSignature off
反映する
# systemctl reload httpd
IPでの直接アクセスを制限する
# vi /etc/httpd/conf.d/ignoreDirectIpAccess.conf


<VirtualHost *:80>
    ServerName any
    <Location />
        Order Deny,Allow
        Deny from all
    </Location>
</VirtualHost>

<VirtualHost *:443>
    ServerName any
    <Location />
        Order Deny,Allow
        Deny from all
    </Location>
</VirtualHost>
反映する
# systemctl reload httpd
Indexに載るのは防止する
# yum -y install php
# systemctl restart httpd
# vi /var/www/vhosts/app.exmple.com/index.php

<?php
header("HTTP/1.1 404 Not Found");
include ('404.php');
exit;
# mkdir -p /var/www/vhosts/app.example.com
# vi /var/www/vhosts/app.example.com/index.html

app.example.com
# mkdir /var/www/htpasswd
# cd /var/www/htpasswd
# htpasswd -c .htpasswd <ユーザ名>
# chown -R apache:apache /var/lib/redmine
反映
systemctl restart httpd
systemctl enable httpd
systemctl status httpd
Let’s Encrypt 無料証明書
cd /usr/local/src
git clone https://github.com/certbot/certbot
cd certbot/
./certbot-auto -n
一旦Apacheを止める
# systemctl stop httpd
証明書発行
# ./certbot-auto certonly --standalone -d app.example.com -m info@example.com --agree-tos -n
# systemctl start httpd
# vi /etc/httpd/conf.d/app.example.com.conf


<VirtualHost *:80>
  DocumentRoot /var/www/vhosts/app.example.com
  ServerName app.example.com

  <Directory "/var/lib/redmine/">
    Require all granted
    Allowoverride All
  </Directory>

  <Location /naishodayo>
    PassengerBaseURI /naishodayo
    PassengerAppRoot /var/lib/redmine

    AuthUserfile /var/www/htpasswd/.htpasswd
    AuthGroupfile /dev/null
    AuthName "Please enter your ID and password"
    AuthType Basic
    require valid-user
  </Location>

  <ifModule mod_rewrite.c>
      RewriteEngine On
      LogLevel alert rewrite:trace3
      RewriteCond %{HTTPS} off
      RewriteRule ^(.*)$ https://%{HTTP_HOST}%{REQUEST_URI} [R,L]
  </ifModule>


</VirtualHost>


<VirtualHost *:443>
  DocumentRoot /var/www/vhosts/app.example.com
  ServerName app.example.com:443

  <Location /naishodayo>
    PassengerBaseURI /naishodayo
    PassengerAppRoot /var/lib/redmine

    AuthUserfile /var/www/htpasswd/.htpasswd
    AuthGroupfile /dev/null
    AuthName "Please enter your ID and password"
    AuthType Basic
    require valid-user
  </Location>

  <Directory "/var/lib/redmine/">
    Require all granted
    Allowoverride All
  </Directory>

  SSLEngine on
  SSLProtocol all -SSLv2
  SSLCipherSuite ALL:!ADH:!EXPORT:!SSLv2:RC4+RSA:+HIGH:+MEDIUM:+LOW

  SSLCertificateFile /etc/letsencrypt/live/app.example.com/cert.pem
  SSLCertificateKeyFile /etc/letsencrypt/live/app.example.com/privkey.pem
  SSLCertificateChainFile /etc/letsencrypt/live/app.example.com/chain.pem

  <Directory "/var/lib/redmine/public">
    Require all granted
    Allowoverride All
  </Directory>

</VirtualHost>
# httpd -t
反映する
systemctl restart httpd
systemctl enable httpd
systemctl status httpd
自動更新
# vi /etc/crontab


SHELL=/bin/bash
PATH=/sbin:/bin:/usr/sbin:/usr/bin
MAILTO=''

# For details see man 4 crontabs

# Example of job definition:
# .---------------- minute (0 - 59)
# |  .------------- hour (0 - 23)
# |  |  .---------- day of month (1 - 31)
# |  |  |  .------- month (1 - 12) OR jan,feb,mar,apr ...
# |  |  |  |  .---- day of week (0 - 6) (Sunday=0 or 7) OR sun,mon,tue,wed,thu,fri,sat
# |  |  |  |  |
# *  *  *  *  * user-name  command to be executed

# Let's Encrypt 証明書自動更新
0 4 1 * * root /bin/systemctl stop httpd && /usr/local/src/certbot/certbot-auto renew --force-renewal && /bin/systemctl start httpd
# systemctl restart crond
# reboot now
https://ドメイン/naishodayo