どうも、もりこういちろうです。
Ansibleで自分のサーバを4つ作ってみました。
Ansibleをインストールして構成ファイルを作れば自由に編集可能、デザインも後から自由にアレンジできるので難しいプログラミングなしで何台でも、それこそ100台でもあなた好みのサーバを自由自在に作成出来ます。
まるで新しいダンスを作っているみたい。
なかなかいい感じに仕上がりました。
インターネットを通じてより多くのことを知って貰うために、Wix.comであなただけの本格ホームページを作成しましょう。
もくじ
目的
自社主催のハッキングカンファレンス用のやられ役サーバのひな形として作成しています。インターネット公開用の設定ではないので参考程度にして下さいませ。
環境
- CentOS7
- Ansible2.7.7
Ansible2.7以外では当記事のコードは上手く動かないと考えられます、Ansibleはバージョンの後方互換性が薄いからです。
構成
Ansibleサーバ
- 192.168.11.100
Ansibleクライアント
- 192.168.11.101
- 192.168.11.102
- 192.168.11.103
- 192.168.11.104
WEBとDBが1つのサーバで動作するシンプル構成 × 4台
4台作る目的はカンファレンスの攻撃参加者が30人程いるので攻撃を分散する為と、1つのサーバがハックされても他の台で楽しめるようにする為です。
Ansibleサーバ設定
# hostnamectl set-hostname ansible.example.net
# vi /etc/sysconfig/selinux

#SELINUX=enforcing
SELINUX=disabled
# reboot now
yum -y install epel-release
yum -y install ansible
yum -y install MySQL-python
yum -y install libselinux-python
yum -y install rsync
# ansible --version

ansible 2.7.7
  config file = /etc/ansible/ansible.cfg
  configured module search path = [u'/root/.ansible/plugins/modules', u'/usr/share/ansible/plugins/modules']
  ansible python module location = /usr/lib/python2.7/site-packages/ansible
  executable location = /usr/bin/ansible
  python version = 2.7.5 (default, Apr 11 2018, 07:36:10) [GCC 4.8.5 20150623 (Red Hat 4.8.5-28)]
鍵の作成
# ssh-keygen -t rsa -b 4096

Generating public/private rsa key pair.
Enter file in which to save the key (/root/.ssh/id_rsa):
Created directory '/root/.ssh'.
Enter passphrase (empty for no passphrase):
Enter same passphrase again:
Your identification has been saved in /root/.ssh/id_rsa.
Your public key has been saved in /root/.ssh/id_rsa.pub.
The key fingerprint is:
SHA256:K1Jo3WhHCIgkHVdeM/mlTS80tE9Oz0JVetr+hm+aQak root@ansible.example.net
The key's randomart image is:
+---[RSA 4096]----+
|o+.oo.. +. ..   +|
|o o. o o.o  =. o |
|      o .. *.o= .|
|     o +  o o*.B |
|    o = S    .B +|
|   . o . .   o o |
|    . . .   E ...|
|     . .      .o+|
|              o=o|
+----[SHA256]-----+
ターゲット用のサーバ
# vi .ssh/config


Host yuruhack-web101
    HostName 192.168.11.101

Host yuruhack-web102
    HostName 192.168.11.102

Host yuruhack-web103
    HostName 192.168.11.103

Host yuruhack-web104
    HostName 192.168.11.104
# ssh-copy-id yuruhack-web101

/usr/bin/ssh-copy-id: INFO: Source of key(s) to be installed: "/root/.ssh/id_rsa.pub"
The authenticity of host '192.168.11.101 (192.168.11.101)' can't be established.
ECDSA key fingerprint is SHA256:8BSC790xfrVG130x7Lklexd2nrrAtLmSQPujj5FAdYg.
ECDSA key fingerprint is MD5:fb:12:e5:e5:ec:79:a1:28:ee:7a:ed:71:37:98:36:02.
Are you sure you want to continue connecting (yes/no)? yes
/usr/bin/ssh-copy-id: INFO: attempting to log in with the new key(s), to filter out any that are already installed
/usr/bin/ssh-copy-id: INFO: 1 key(s) remain to be installed -- if you are prompted now it is to install the new keys
root@192.168.11.101's password:

Number of key(s) added: 1

Now try logging into the machine, with:   "ssh 'yuruhack-web101'"
and check to make sure that only the key(s) you wanted were added.
他のサーバにも鍵を渡していく
ssh-copy-id yuruhack-web102
ssh-copy-id yuruhack-web103
ssh-copy-id yuruhack-web104
# vi /etc/ansible/hosts

[web]
192.168.11.101
192.168.11.102
192.168.11.103
192.168.11.104
疎通確認
# ansible all -i /etc/ansible/hosts -m ping

192.168.11.102 | SUCCESS => {
    "changed": false,
    "ping": "pong"
}
192.168.11.101 | SUCCESS => {
    "changed": false,
    "ping": "pong"
}
192.168.11.104 | SUCCESS => {
    "changed": false,
    "ping": "pong"
}
192.168.11.103 | SUCCESS => {
    "changed": false,
    "ping": "pong"
}
Ansibleサーバから操作出来ることを確認
設定ファイルの作成
# mkdir -p /etc/ansible/yuruhack.example.net/v1/web/etc/httpd/conf.d
変数ファイルの作成
# vi /etc/ansible/yuruhack.example.net/v1/var_yml


---
usergroup:
  user:
    name: webadmin
    group: apache
    password: webadminPassword
app_path: "/var/www/vhosts/yuruhack.example.net/httpdocs/"
mysql_root_password: rootdbpassword
ssh_port: 722
mynetwork: 192.168.11.0/24
dbName: wpdb
dbUser: wpdbuser
dbPassword: wpP@ssWordYuruHack
dbNetwork: localhost
WordPressファイルのダウンロード
yum install wget unzip
mkdir -p /etc/ansible/yuruhack.example.net/v1/web/httpdocs/
wget https://ja.wordpress.org/latest-ja.zip
unzip latest-ja.zip
mv wordpress/* /etc/ansible/yuruhack.example.net/v1/web/httpdocs/
バーチャルホストファイルのひな形
# vi /etc/ansible/yuruhack.example.net/v1/web/etc/httpd/conf.d/yuruhack.example.net.conf


<VirtualHost *:80>
ServerAdmin root
ServerName yuruhack.example.net
DocumentRoot /var/www/vhosts/yuruhack.example.net/httpdocs/


<IfModule mod_rewrite.c>
    Include /etc/httpd/conf.d/mod_dosdetector_rewrite.conf
</IfModule>

</VirtualHost>
# vi /etc/ansible/yuruhack.example.net/v1/web/etc/httpd/conf.d/mod_dosdetector_rewrite.conf


## リライトルール
RewriteEngine On

# for DoS attack
RewriteCond %{ENV:SuspectDoS} .+ [OR]
RewriteCond %{ENV:SuspectHardDoS} .+
# クラスAのローカルIPアドレス帯を全て除外
RewriteCond %{REMOTE_ADDR} !^(10\.[0-9]+\.[0-9]\.[0-9])$
# クラスBのローカルIPアドレス帯を全て除外
RewriteCond %{REMOTE_ADDR} !^(172\.(1[6-9]|2[0-9]|3[0-1])\.[0-9]+\.[0-9]+)$
# クラスCのローカルIPアドレス帯を全て除外
RewriteCond %{REMOTE_ADDR} !^(192\.168\.[0-9]+\.[0-9]+)$
# 対クローラー排除
RewriteCond %{HTTP_USER_AGENT} !(google|yahoo|msn|bing) [NC]
RewriteRule .* - [R=506,L]
ErrorDocument 506 "Yararetazee!! you get wpP@ssWordYuruHack"
mkdir -p /etc/ansible/yuruhack.example.net/v1/web/etc/vsftpd/user_conf
touch /etc/ansible/yuruhack.example.net/v1/web/etc/vsftpd/chroot_list
# vi /etc/ansible/yuruhack.example.net/v1/web/etc/vsftpd/user_conf/webadmin

local_root=/var/www/vhosts/
# vi /etc/ansible/yuruhack.example.net/v1/web/etc/vsftpd/vsftpd.conf


local_enable=YES
write_enable=YES
local_umask=022
dirmessage_enable=YES
connect_from_port_20=YES
xferlog_std_format=YES
listen=YES
listen_ipv6=NO
pam_service_name=vsftpd
userlist_enable=YES
tcp_wrappers=YES
anonymous_enable=NO

ascii_upload_enable=YES
ascii_download_enable=YES
ftpd_banner=Welcome to blah FTP service.

chroot_local_user=YES
chroot_list_enable=YES
chroot_list_file=/etc/vsftpd/chroot_list

ls_recurse_enable=YES
pam_service_name=vsftpd
tcp_wrappers=YES

userlist_deny=NO


pasv_min_port=50000
pasv_max_port=50030

chroot_local_user=YES

force_dot_files=YES

xferlog_file=/var/log/vsftpd.log
xferlog_std_format=NO
log_ftp_protocol=YES


#ssl_enable=YES
#pasv_addr_resolve=YES

pasv_address=
#rsa_cert_file=/etc/pki/tls/certs/ftp.pem
#require_ssl_reuse=NO
#force_local_logins_ssl=NO
#force_local_data_ssl=NO
#port_enable=YES
#allow_anon_ssl=NO

use_localtime=YES

allow_writeable_chroot=YES

user_config_dir=/etc/vsftpd/user_conf
#listen_port=21
# vi /etc/ansible/yuruhack.example.net/v1/web/etc/vsftpd/user_list

# vsftpd userlist
# If userlist_deny=NO, only allow users in this file
# If userlist_deny=YES (default), never allow users in this file, and
# do not even prompt for a password.
# Note that the default vsftpd pam config also checks /etc/vsftpd/ftpusers
# for users that are denied.
root
bin
daemon
adm
lp
sync
shutdown
halt
mail
news
uucp
operator
games
nobody
webadmin
playbookの作成
# vi /etc/ansible/yuruhack.example.net/v1/playbook.yml
---
- hosts: web
become: yes
vars_files:
- var_yml
tasks:
- name: Firewalldの状態チェック
command: systemctl is-active firewalld
register: firewalld_result
changed_when: False
ignore_errors: True
- name: Firewalldの起動, 自動起動設定
service: name=firewalld state=started enabled=yes
- name: Firewalld設定 80許可
firewalld: permanent=True port=80/tcp state=enabled immediate=true
- name: Firewalld設定 443許可
firewalld: permanent=True port=443/tcp state=enabled immediate=true
- name: Firewalld設定 21許可
firewalld: permanent=True port=21/tcp state=enabled immediate=true
- name: Firewalld設定 50000-50030許可
firewalld: permanent=True port=50000-50030/tcp state=enabled immediate=true
- name: EPEL, remi リポジトリの追加
yum:
name: "{{ package }}"
state: latest
vars:
package:
- epel-release
- http://rpms.famillecollet.com/enterprise/remi-release-7.rpm
- name: Basicツールのインストール
yum:
name: "{{ package }}"
state: latest
vars:
package:
- zip
- unzip
- git
- gcc
- name: Apacheのインストール
yum:
name: "{{ package }}"
state: latest
vars:
package:
- httpd
- httpd-devel
- name: MariaDBクライアントインストール
yum:
name: "{{ package }}"
state: latest
vars:
package:
- MySQL-python
- mariadb
- name: PHPインストール
yum:
name: "{{ package }}"
state: latest
vars:
package:
- php
- php-mysql
- php-mbstring
- php-gd
- php-devel
- php-xml
- php-pdo
- name: PHPのタイムゾーン設定
replace:
dest: /etc/php.ini
regexp: "{{ item.regexp }}"
replace: "{{ item.replace }}"
with_items:
- { regexp: "^;date.timezone =", replace: "date.timezone = Asia/Tokyo" }
- { regexp: "^expose_php = On", replace: "expose_php = Off" }
- name: APPフォルダ作成
file: path="{{ app_path }}" state=directory owner=root group=root mode=0755
- name: Apache設定 Ansibleサーバから設定ファイルを複製
copy:
src: "{{ item }}"
dest: /etc/httpd/conf.d/
owner: root
group: root
mode: 0644
with_fileglob:
- "./web/etc/httpd/conf.d/*.conf"
- name: Apache設定 index.phpをDirectoryIndexに登録する
replace:
dest: /etc/httpd/conf/httpd.conf
regexp: "{{ item.regexp }}"
replace: "{{ item.replace }}"
with_items:
- { regexp: "^DirectoryIndex index.html", replace: "DirectoryIndex index.php index.html" }
- { regexp: "^User apache", replace: "User {{ usergroup.user.name }}" }
- name: バーチャルホスト ServerName設定
replace:
dest: /etc/httpd/conf.d/yuruhack.example.net.conf
regexp: "{{ item.regexp }}"
replace: "{{ item.replace }}"
with_items:
- { regexp: "^ServerName=", replace: "ServerName {{ ansible_default_ipv4.address }}" }
- name: clone mod_dosdetector
git: repo=https://github.com/stanaka/mod_dosdetector.git dest=/usr/local/src/mod_dosdetector
- name: mod_dosdetecotr インストール時のエラー防止用コマンド用リンク作成
file:
src: /usr/bin/apxs
dest: /usr/sbin/apxs
state: link
- name: make mod_dosdetector
command: make install chdir=/usr/local/src/mod_dosdetector
- name: WEBユーザの作成.1 Salt作成
shell: "mktemp -u | awk '{print substr($0, length($0)-8+1)}'"
register: salt
- name: WEBユーザの作成.2 パスワード用ハッシュ作成
shell: python -c 'import crypt; print crypt.crypt("{{ usergroup.user.password }}", "$6${{ salt.stdout }}")'
register: hash_password
- name: WEBユーザの作成.3 ユーザ作成
user: name={{ usergroup.user.name }} password={{ hash_password.stdout }} groups={{usergroup.user.group}}
- name: バーチャルホストディレクトリの権限変更
file:
path: /var/www/vhosts
owner: "{{ usergroup.user.name }}"
group: apache
recurse: yes
- name: AnsibleサーバからWordPressファイルを複製
synchronize: src=./web/httpdocs/ dest=/var/www/vhosts/yuruhack.example.net/httpdocs/
- name: パーミッション設定
file:
path: "{{ app_path }}/"
state: directory
owner: "{{ usergroup.user.name }}"
group: apache
mode: 0755
recurse: yes
- name: Apacheの起動
systemd:
name: httpd.service
state: restarted
daemon_reload: yes
enabled: yes
- name: vsftpdインストール
yum:
name: "{{ package }}"
state: latest
vars:
package:
- vsftpd
- name: vsftpd設定 Ansibleサーバから設定ファイルを複製
synchronize: src=./web/etc/vsftpd/ dest=/etc/vsftpd/
- name: vsftpd設定
replace:
dest: /etc/vsftpd/vsftpd.conf
regexp: "{{ item.regexp }}"
replace: "{{ item.replace }}"
with_items:
- { regexp: "^pasv_address=", replace: "pasv_address={{ ansible_default_ipv4.address }}" }
- name: vsftpd起動
systemd:
name: vsftpd.service
state: restarted
daemon_reload: yes
enabled: yes
- name: MariaDB インストール
yum:
name: "{{ package }}"
state: latest
vars:
package:
- MySQL-python
- mariadb
- mariadb-libs
- mariadb-server
- mariadb-devel
- name: MySQL起動, 自動起動
service: name=mariadb state=started enabled=yes
- name: DBの作成
mysql_db: name={{ dbName }} state=present
- name: DBユーザの作成
mysql_user:
name: "{{ dbUser }}"
password: "{{ dbPassword }}"
priv: "{{ dbName }}.*:ALL"
host: "{{ dbNetwork }}"
state: present
- name: ローカル接続制限無効化
replace: >
dest=/etc/my.cnf
regexp='^bind-address'
replace='#bind-address'
- name: MySQL再起動, 自動起動
service: name=mariadb state=restarted enabled=yes
- name: phpMyAdminインストール
yum:
name: "{{ package }}"
state: latest
vars:
package:
- phpMyAdmin
- name: phpMyAdminアクセス権限の変更 ローカルネットワークのアクセス許可
replace:
dest: /etc/httpd/conf.d/phpMyAdmin.conf
regexp: "{{ item.regexp }}"
replace: "{{ item.replace }}"
with_items:
- { regexp: "Require ip 127.0.0.1", replace: "Require ip 127.0.0.1 {{ mynetwork }}" }
- name: Apache再起動
service: name=httpd state=restarted enabled=yes
- name: Firewalldの起動, 自動起動設定
service: name=firewalld state=started enabled=yes
- name: Firewalld設定 3306許可 ローカルネットワークのみDBへの接続許可
firewalld: permanent=True port=3306/tcp source={{ mynetwork }} state=enabled immediate=true
- name: Firewalld設定 80許可 phpMyAdmin用
firewalld: permanent=True port=80/tcp state=enabled immediate=true
- name: Firewalldの再起動, 自動起動設定
service: name=firewalld state=restarted enabled=yes
- hosts: all
become: yes
vars_files:
- var_yml
remote_user: root
tasks:
- name: yumアップデート
yum: name=* state=latest
- name: SELinux-1. SELinux用のPythonモジュールをインストール
yum: name=libselinux-python state=installed
- name: SELinux-2. SELinuxの無効化
selinux: state=disabled
register: selinux
- name: SELinux-3. サーバの再起動
shell: sleep 2 && shutdown -r now
async: 1
poll: 0
become: true
ignore_errors: true
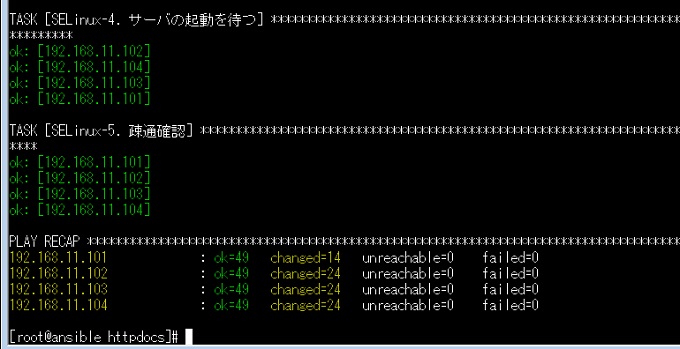
- name: SELinux-4. サーバの起動を待つ
wait_for_connection:
delay: 30
timeout: 300
- name: SELinux-5. 疎通確認
ping:
構文チェック
# ansible-playbook /etc/ansible/yuruhack.example.net/v1/playbook.yml --syntax-check

ドライラン
# ansible-playbook /etc/ansible/yuruhack.example.net/v1/playbook.yml --check
実行
# ansible-playbook /etc/ansible/yuruhack.example.net/v1/playbook.yml
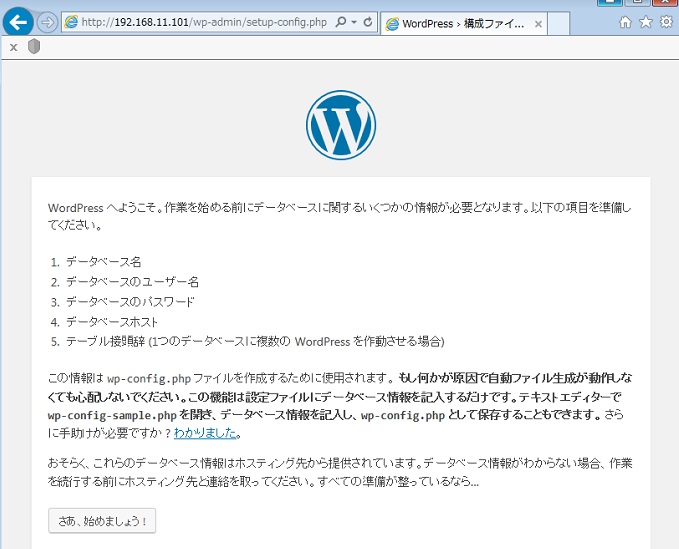
http://192.168.11.101/
http://192.168.11.102/
http://192.168.11.103/
http://192.168.11.104/
4台のWordPress用サーバが作成出来ました。
お疲れ様です。
ここからいくつか脆弱性を埋め込んでいきます。
関連記事 - More from my site -
 Ansible Datadog Agent Ubuntu
 Ubuntu sudoできるユーザ作成 Ansible
 Ansible2.7 Laravel最新版 開発環境作成 CentOS7
 【Ansible Error 】Cannot allocate memory
 Ansibleで構成管理
 WordPress 更新情報サービス
 MySQL 外部キー制約のデッドロック
 Laravel5 PHP-JWT Firebase製のJWTライブラリで認証
 Zabbix3系 Load Averageを監視するテンプレートの追加
 【工事中】Laravel mix
 WordPress+Nginx xmlrpc.php対策
 Terraformローカルでの構築用IAM Policy
 MySQL レプリケーション監視スクリプト
- 「Udemy もう怖くないGit」 メモ