@Ping-t
Ping-tのシミュレーション問題やってみたのでノート(ㆁᴗㆁ✿)
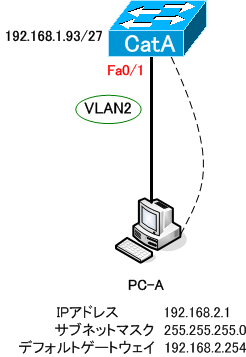
・スイッチの名前とIPアドレスを設定しましょう。
スイッチに「CatA」という名前を付けてください。また、管理VLANに図の通りのIPアドレスを設定して下さい。
Switch>enable
Switch#configure terminal
Switch#configure terminal
CatA(config)#interface vlan 1
CatA(config-if)#ip address 192.168.1.93 255.255.255.224
・インターフェースの通信速度、Duplexの設定
CatAのfa0/1にPC-Aが接続されました。「Show Topology」ボタンで構成図を確認できます。
CatA(config-if)#end
*2017-08-13 23:17:55 %SYS-5-CONFIG_I: Configured from console by console
CatA#show interfaces status

Port	Name	Status	Vlan	Duplex	Speed	Type
-------	-------------------------------	---------------	--------	---------	----------	-------
Fa0/1		connected	1	A-Full	A-100	100BaseTX/FX
Fa0/2		not connect	1	Auto	Auto	100BaseTX/FX
Fa0/3		not connect	1	Auto	Auto	100BaseTX/FX
Fa0/4		not connect	1	Auto	Auto	100BaseTX/FX
Fa0/5		not connect	1	Auto	Auto	100BaseTX/FX
Fa0/6		not connect	1	Auto	Auto	100BaseTX/FX
Fa0/7		not connect	1	Auto	Auto	100BaseTX/FX
Fa0/8		not connect	1	Auto	Auto	100BaseTX/FX
Fa0/9		not connect	1	Auto	Auto	100BaseTX/FX
Fa0/10		not connect	1	Auto	Auto	100BaseTX/FX
Fa0/11		not connect	1	Auto	Auto	100BaseTX/FX
Fa0/12		not connect	1	Auto	Auto	100BaseTX/FX
CatA#conf t
CatA(config)#interface FastEthernet 0/1
CatA(config-if)#duplex full
CatA(config-if)#speed 100
CatA(config-if)#end
CatA#show interfaces status

Port	Name	Status	Vlan	Duplex	Speed	Type
-------	-------------------------------	---------------	--------	---------	----------	-------
Fa0/1		connected	1	Full	100	100BaseTX/FX
Fa0/2		not connect	1	Auto	Auto	100BaseTX/FX
Fa0/3		not connect	1	Auto	Auto	100BaseTX/FX
Fa0/4		not connect	1	Auto	Auto	100BaseTX/FX
Fa0/5		not connect	1	Auto	Auto	100BaseTX/FX
Fa0/6		not connect	1	Auto	Auto	100BaseTX/FX
Fa0/7		not connect	1	Auto	Auto	100BaseTX/FX
Fa0/8		not connect	1	Auto	Auto	100BaseTX/FX
Fa0/9		not connect	1	Auto	Auto	100BaseTX/FX
Fa0/10		not connect	1	Auto	Auto	100BaseTX/FX
Fa0/11		not connect	1	Auto	Auto	100BaseTX/FX
Fa0/12		not connect	1	Auto	Auto	100BaseTX/FX
・VLANの作成とポートへの割り当て
vlan databaseモードでvlan2を作成し、fa0/1に割り当てて下さい。
設定後、「show vlan」、「show interfaces status」で確認して下さい。
CatA#vlan database
CatA(vlan)#vlan 2
VLAN 2 added:
         Name: VLAN0002
CatA(vlan)#exit
APPLY completed.
Exiting....
CatA#conf t
CatA(config)#int fa0/1
CatA(config-if)#switchport access vlan 2
CatA(config-if)#end
*2017-08-13 23:26:33 %SYS-5-CONFIG_I: Configured from console by console
CatA#show vlan
VLAN	Name	Status	Ports
--------	--------------------------------	---------	-------------------------------
1	default	active	Fa0/2,Fa0/3,Fa0/4,Fa0/5,
Fa0/6,Fa0/7,Fa0/8,Fa0/9,
Fa0/10,Fa0/11,Fa0/12
2	VLAN0002	active	Fa0/1
1002	fddi-default	active
1003	token-ring-default	active
1004	fddinet-default	active
1005	trnet-default	active

VLAN	Type	SAID	MTU	Parent	RingNo	BridgeNo	Stp	BrdgMode	Trans1	Trans2
--------	--------	-----------	--------	--------	--------	-----------	--------	------------	--------	--------
1	enet	1000001	1500	-	-	-	-	-	0	0
2	enet	1000002	1500	-	-	-	-	-	0	0
1002	fddi	1001002	1500	-	-	-	-	-	0	0
1003	tr	1001003	1500	-	-	-	-	-	0	0
1004	fdnet	1001004	1500	-	-	-	ieee	-	0	0
1005	trnet	1001005	1500	-	-	-	ibm	-	0	0
CatA#show interfaces status

Port	Name	Status	Vlan	Duplex	Speed	Type
-------	-------------------------------	---------------	--------	---------	----------	-------
Fa0/1		connected	2	Full	100	100BaseTX/FX
Fa0/2		not connect	1	Auto	Auto	100BaseTX/FX
Fa0/3		not connect	1	Auto	Auto	100BaseTX/FX
Fa0/4		not connect	1	Auto	Auto	100BaseTX/FX
Fa0/5		not connect	1	Auto	Auto	100BaseTX/FX
Fa0/6		not connect	1	Auto	Auto	100BaseTX/FX
Fa0/7		not connect	1	Auto	Auto	100BaseTX/FX
Fa0/8		not connect	1	Auto	Auto	100BaseTX/FX
Fa0/9		not connect	1	Auto	Auto	100BaseTX/FX
Fa0/10		not connect	1	Auto	Auto	100BaseTX/FX
Fa0/11		not connect	1	Auto	Auto	100BaseTX/FX
Fa0/12		not connect	1	Auto	Auto	100BaseTX/FX
・インターフェースの通信速度、Duplexの設定
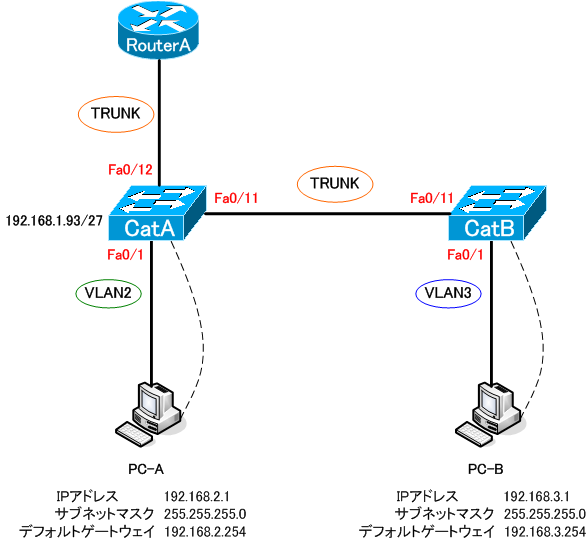
CatAのfa0/12にRouterAが接続されました。「Show Topology」ボタンで構成図を確認できます。
「show interfaces status」でfa0/12の「status」、「duplex」、「speed」を確認してみましょう。
その後、fa0/12のduplexを「半二重」、速度を「10Mbps」に設定し、設定後「show interfaces status」で確認して下さい。
CatA#show interfaces status

Port	Name	Status	Vlan	Duplex	Speed	Type
-------	-------------------------------	---------------	--------	---------	----------	-------
Fa0/1		connected	2	Full	100	100BaseTX/FX
Fa0/2		not connect	1	Auto	Auto	100BaseTX/FX
Fa0/3		not connect	1	Auto	Auto	100BaseTX/FX
Fa0/4		not connect	1	Auto	Auto	100BaseTX/FX
Fa0/5		not connect	1	Auto	Auto	100BaseTX/FX
Fa0/6		not connect	1	Auto	Auto	100BaseTX/FX
Fa0/7		not connect	1	Auto	Auto	100BaseTX/FX
Fa0/8		not connect	1	Auto	Auto	100BaseTX/FX
Fa0/9		not connect	1	Auto	Auto	100BaseTX/FX
Fa0/10		not connect	1	Auto	Auto	100BaseTX/FX
Fa0/11		not connect	1	Auto	Auto	100BaseTX/FX
Fa0/12		connected	1	A-Half	A-10	100BaseTX/FX
CatA#conf t
CatA(config)#int fa0/12
CatA(config-if)#duplex half
CatA(config-if)#speed 10
CatA(config-if)#end
*2017-08-13 23:31:10 %SYS-5-CONFIG_I: Configured from console by console
CatA#show interfaces status

Port	Name	Status	Vlan	Duplex	Speed	Type
-------	-------------------------------	---------------	--------	---------	----------	-------
Fa0/1		connected	2	Full	100	100BaseTX/FX
Fa0/2		not connect	1	Auto	Auto	100BaseTX/FX
Fa0/3		not connect	1	Auto	Auto	100BaseTX/FX
Fa0/4		not connect	1	Auto	Auto	100BaseTX/FX
Fa0/5		not connect	1	Auto	Auto	100BaseTX/FX
Fa0/6		not connect	1	Auto	Auto	100BaseTX/FX
Fa0/7		not connect	1	Auto	Auto	100BaseTX/FX
Fa0/8		not connect	1	Auto	Auto	100BaseTX/FX
Fa0/9		not connect	1	Auto	Auto	100BaseTX/FX
Fa0/10		not connect	1	Auto	Auto	100BaseTX/FX
Fa0/11		not connect	1	Auto	Auto	100BaseTX/FX
Fa0/12		connected	1	Half	10	100BaseTX/FX
・TRUNKの設定
fa0/12をトランクポートにしましょう。また、カプセル化は「IEEE802.1q」を指定して下さい。
設定後、「show interfaces status」や「show running-config 」で確認して下さい。
CatA#conf t
CatA(config)#int fa0/12
CatA(config-if)#switchport mode trunk
CatA(config-if)#switchport trunk encapsulation dot1q
CatA(config-if)#end
*2017-08-13 23:33:37 %SYS-5-CONFIG_I: Configured from console by console
CatA#show interfaces status

Port	Name	Status	Vlan	Duplex	Speed	Type
-------	-------------------------------	---------------	--------	---------	----------	-------
Fa0/1		connected	2	Full	100	100BaseTX/FX
Fa0/2		not connect	1	Auto	Auto	100BaseTX/FX
Fa0/3		not connect	1	Auto	Auto	100BaseTX/FX
Fa0/4		not connect	1	Auto	Auto	100BaseTX/FX
Fa0/5		not connect	1	Auto	Auto	100BaseTX/FX
Fa0/6		not connect	1	Auto	Auto	100BaseTX/FX
Fa0/7		not connect	1	Auto	Auto	100BaseTX/FX
Fa0/8		not connect	1	Auto	Auto	100BaseTX/FX
Fa0/9		not connect	1	Auto	Auto	100BaseTX/FX
Fa0/10		not connect	1	Auto	Auto	100BaseTX/FX
Fa0/11		not connect	1	Auto	Auto	100BaseTX/FX
Fa0/12		connected	trunk	Half	10	100BaseTX/FX
CatA#show running-config

Building configuration...
Current configuration:
!
version 12.0
no service pad
service timestamps debug uptime
service timestamps log uptime
no service password-encryption
!
hostname CatA
!
!
!
!
!
!
!
ip subnet-zero
!
!
!
interface FastEthernet0/1
  duplex full
  speed 100
  switchport access vlan 2
!
interface FastEthernet0/2
!
interface FastEthernet0/3
!
interface FastEthernet0/4
!
interface FastEthernet0/5
!
interface FastEthernet0/6
!
interface FastEthernet0/7
!
interface FastEthernet0/8
!
interface FastEthernet0/9
!
interface FastEthernet0/10
!
interface FastEthernet0/11
!
interface FastEthernet0/12
  duplex half
  speed 10
  switchport trunk encapsulation dot1q
  switchport mode trunk
!
interface VLAN1
  ip address 192.168.1.93 255.255.255.224
  no ip directed-broadcast
  no ip route-cache
!
!
line con 0
  logging synchronous
  transport input none
  stopbits 1
line vty 0 4
  login
line vty 5 15
  login
!
end
・デフォルトゲートウェイの設定
デフォルトゲートウェイを「192.168.1.94」で設定して下さい。このアドレスはRouterAのサブインターフェースのIPアドレスです。
設定後、「show running-config 」で確認して下さい。
CatA#conf t
CatA(config)#ip default-gateway 192.168.1.94
CatA(config)#exit
*2017-08-13 23:35:58 %SYS-5-CONFIG_I: Configured from console by console
CatA#show running-config

Building configuration...
Current configuration:
!
version 12.0
no service pad
service timestamps debug uptime
service timestamps log uptime
no service password-encryption
!
hostname CatA
!
!
!
!
!
!
!
ip subnet-zero
!
!
!
interface FastEthernet0/1
  duplex full
  speed 100
  switchport access vlan 2
!
interface FastEthernet0/2
!
interface FastEthernet0/3
!
interface FastEthernet0/4
!
interface FastEthernet0/5
!
interface FastEthernet0/6
!
interface FastEthernet0/7
!
interface FastEthernet0/8
!
interface FastEthernet0/9
!
interface FastEthernet0/10
!
interface FastEthernet0/11
!
interface FastEthernet0/12
  duplex half
  speed 10
  switchport trunk encapsulation dot1q
  switchport mode trunk
!
interface VLAN1
  ip address 192.168.1.93 255.255.255.224
  no ip directed-broadcast
  no ip route-cache
!
ip default-gateway 192.168.1.94
!
line con 0
  logging synchronous
  transport input none
  stopbits 1
line vty 0 4
  login
line vty 5 15
  login
!
end
・インターフェースのメモ
fa0/1に「PC-A VLAN2」、fa0/12に「RouterA TRUNK」というメモを残してください。
設定後、「show interfaces status」で確認して下さい。
CatA#conf t
CatA(config)#int fa0/1
CatA(config-if)#description PC-A VLAN2
CatA(config-if)#int fa0/12
CatA(config-if)#description RouterA TRUNK
CatA(config-if)#end
*2017-08-13 23:37:58 %SYS-5-CONFIG_I: Configured from console by console
CatA#show interfaces status

Port	Name	Status	Vlan	Duplex	Speed	Type
-------	-------------------------------	---------------	--------	---------	----------	-------
Fa0/1	PC-A VLAN2	connected	2	Full	100	100BaseTX/FX
Fa0/2		not connect	1	Auto	Auto	100BaseTX/FX
Fa0/3		not connect	1	Auto	Auto	100BaseTX/FX
Fa0/4		not connect	1	Auto	Auto	100BaseTX/FX
Fa0/5		not connect	1	Auto	Auto	100BaseTX/FX
Fa0/6		not connect	1	Auto	Auto	100BaseTX/FX
Fa0/7		not connect	1	Auto	Auto	100BaseTX/FX
Fa0/8		not connect	1	Auto	Auto	100BaseTX/FX
Fa0/9		not connect	1	Auto	Auto	100BaseTX/FX
Fa0/10		not connect	1	Auto	Auto	100BaseTX/FX
Fa0/11		not connect	1	Auto	Auto	100BaseTX/FX
Fa0/12	RouterA TRUNK	connected	trunk	Half	10	100BaseTX/FX
・VTPドメイン名の設定
VTPドメイン名を「rouegarpin」と設定して下さい。
設定後、「show vtp status」で確認して下さい。
CatA#vlan database
CatA(vlan)#vtp domain rouegarpin

Changing VTP domain name from NULL to rouegarpin
CatA(vlan)#exit
APPLY completed.
Exiting....
CatA#show vtp status

VTP Version	: 2
Configuration Revision	: 0
Maximum VLANs supported locally	: 68
Number of existing VLANs	: 6
VTP Operating Mode	: Server
VTP Domain Name	: rouegarpin
VTP Pruning Mode	: Disabled
VTP V2 Mode	: Disabled
VTP Traps Generation	: Disabled
MD5 digest	: 0xnn 0xnn 0xnn 0xnn 0xnn 0xnn 0xnn 0xnn
Configuration last modified by 0.0.0.0 at 08-13-17 23:30:08
Question 9
・新規スイッチの接続
CatAのfa0/11にCatBが接続されました。「Show Topology」ボタンで構成図を確認できます。
CatAのfa0/11をトランクポートに設定しましょう。カプセル化は「isl」とします。
設定後、「show interfaces status」や「show running-config 」で確認して下さい。
*カプセル化タイプのISLは、Catalyst2900シリーズのデフォルトですので、「show running-config 」に表示されません。
CatA>enable
CatA#conf t
CatA(config)#int fa0/11
CatA(config-if)#switchport mode trunk
CatA(config-if)#switchport trunk encapsulation isl
CatA(config-if)#end
*2017-08-14 00:42:15 %SYS-5-CONFIG_I: Configured from console by console
CatA#show interfaces status

Port	Name	Status	Vlan	Duplex	Speed	Type
-------	-------------------------------	---------------	--------	---------	----------	-------
Fa0/1	PC-A VLAN2	connected	2	Full	100	100BaseTX/FX
Fa0/2		not connect	1	Auto	Auto	100BaseTX/FX
Fa0/3		not connect	1	Auto	Auto	100BaseTX/FX
Fa0/4		not connect	1	Auto	Auto	100BaseTX/FX
Fa0/5		not connect	1	Auto	Auto	100BaseTX/FX
Fa0/6		not connect	1	Auto	Auto	100BaseTX/FX
Fa0/7		not connect	1	Auto	Auto	100BaseTX/FX
Fa0/8		not connect	1	Auto	Auto	100BaseTX/FX
Fa0/9		not connect	1	Auto	Auto	100BaseTX/FX
Fa0/10		not connect	1	Auto	Auto	100BaseTX/FX
Fa0/11		connected	trunk	A-Full	A-100	100BaseTX/FX
Fa0/12	RouterA TRUNK	connected	trunk	Half	10	100BaseTX/FX
CatA#show run
Building configuration...
Current configuration:
!
version 12.0
no service pad
service timestamps debug uptime
service timestamps log uptime
no service password-encryption
!
hostname CatA
!
!
!
!
!
!
!
ip subnet-zero
!
!
!
interface FastEthernet0/1
  description PC-A VLAN2
  duplex full
  speed 100
  switchport access vlan 2
!
interface FastEthernet0/2
!
interface FastEthernet0/3
!
interface FastEthernet0/4
!
interface FastEthernet0/5
!
interface FastEthernet0/6
!
interface FastEthernet0/7
!
interface FastEthernet0/8
!
interface FastEthernet0/9
!
interface FastEthernet0/10
!
interface FastEthernet0/11
  switchport mode trunk
!
interface FastEthernet0/12
  description RouterA TRUNK
  duplex half
  speed 10
  switchport trunk encapsulation dot1q
  switchport mode trunk
!
interface VLAN1
  ip address 192.168.1.93 255.255.255.224
  no ip directed-broadcast
  no ip route-cache
!
ip default-gateway 192.168.1.94
!
line con 0
  logging synchronous
  transport input none
  stopbits 1
line vty 0 4
  login
line vty 5 15
  login
!
end
・VLANの名前
CatAでvlan2の名前を「Soumu」に変更し、またvlan3を新規に作成して名前を「Eigyo」に設定して下さい。
設定後、「show vlan」で確認して下さい。
CatA#vlan database
CatA(vlan)#vlan 2 name Soumu
VLAN 2 modified:
         Name: Soumu
CatA(vlan)#vlan 3 name Eigyo
VLAN 3 added:
         Name: Eigyo
CatA(vlan)#exit
APPLY completed.
Exiting....
CatA#show vlan

VLAN	Name	Status	Ports
--------	--------------------------------	---------	-------------------------------
1	default	active	Fa0/2,Fa0/3,Fa0/4,Fa0/5,
Fa0/6,Fa0/7,Fa0/8,Fa0/9,
Fa0/10
2	Soumu	active	Fa0/1
3	Eigyo	active
1002	fddi-default	active
1003	token-ring-default	active
1004	fddinet-default	active
1005	trnet-default	active

VLAN	Type	SAID	MTU	Parent	RingNo	BridgeNo	Stp	BrdgMode	Trans1	Trans2
--------	--------	-----------	--------	--------	--------	-----------	--------	------------	--------	--------
1	enet	1000001	1500	-	-	-	-	-	0	0
2	enet	1000002	1500	-	-	-	-	-	0	0
3	enet	1000003	1500	-	-	-	-	-	0	0
1002	fddi	1001002	1500	-	-	-	-	-	0	0
1003	tr	1001003	1500	-	-	-	-	-	0	0
1004	fdnet	1001004	1500	-	-	-	ieee	-	0	0
1005	trnet	1001005	1500	-	-	-	ibm	-	0	0
・CatBの設定
CatBに移動し、以下の設定を入れてください。「Show Topology」ボタンで構成図に戻り、PC-BをクリックするとCatBに移動できます。
1.ホスト名
2.VTPドメイン名の設定
3.VTPモードをクライアントへ変更
4.割り当て可能な最初のIPアドレスの設定
5.インターフェースへのVLAN、TRUNKの設定
6.fa0/1のduplexを「全二重」、速度を「100Mbps」に固定し、「PC-B VLAN3」とメモを残す
7.fa0/11に「CatA TRUNK」のメモ
8.デフォルトゲートウェイの設定
1.ホスト名
Switch>enable
Switch#conf t
Switch(config)#host CatB
CatB(config)#exit
*2017-08-14 00:44:43 %SYS-5-CONFIG_I: Configured from console by console
2.VTPドメイン名の設定
CatB#vlan database
CatB(vlan)#vtp domain rouegarpin
Changing VTP domain name from NULL to rouegarpin
3.VTPモードをクライアントへ変更
CatB(vlan)#vtp client
Setting device to VTP CLIENT mode.
CatB(vlan)#exit
In CLIENT state, no apply attempted.
Exiting....
4.割り当て可能な最初のIPアドレスの設定
CatB#conf t
CatB(config)#int vlan 1
CatB(config-if)#ip address 192.168.1.65 255.255.255.224
5.インターフェースへのVLAN、TRUNKの設定
CatB(config-if)#int fa0/11
CatB(config-if)#switchport mode trunk
6.fa0/1のduplexを「全二重」、速度を「100Mbps」に固定し、「PC-B VLAN3」とメモを残す
CatB(config-if)#int fa0/1
CatB(config-if)#switchport access vlan 3
CatB(config-if)#duplex full
CatB(config-if)#speed 100
CatB(config-if)#speed 100
7.fa0/11に「CatA TRUNK」のメモ
CatB(config-if)#int fa0/11
CatB(config-if)#int fa0/11
8.デフォルトゲートウェイの設定
CatB(config-if)#exit
CatB(config)#ip default-gateway 192.168.1.94
設定の保存
スウィッチBで実行
CatB(config)#exit
CatB#copy run start
Destination filename [startup-config]?
Building configuration...
[OK]
CatB#show run

Building configuration...
Current configuration:
!
version 12.0
no service pad
service timestamps debug uptime
service timestamps log uptime
no service password-encryption
!
hostname CatB
!
!
!
!
!
!
!
ip subnet-zero
!
!
!
interface FastEthernet0/1
  description PC-B VLAN3
  duplex full
  speed 100
  switchport access vlan 3
!
interface FastEthernet0/2
!
interface FastEthernet0/3
!
interface FastEthernet0/4
!
interface FastEthernet0/5
!
interface FastEthernet0/6
!
interface FastEthernet0/7
!
interface FastEthernet0/8
!
interface FastEthernet0/9
!
interface FastEthernet0/10
!
interface FastEthernet0/11
  description CatA TRUNK
  switchport mode trunk
!
interface FastEthernet0/12
!
interface VLAN1
  ip address 192.168.1.65 255.255.255.224
  no ip directed-broadcast
  no ip route-cache
!
ip default-gateway 192.168.1.94
!
line con 0
  logging synchronous
  transport input none
  stopbits 1
line vty 0 4
  login
line vty 5 15
  login
!
end
スウィッチAで実行
CatA#copy run start

Destination filename [startup-config]?
Building configuration...
[OK]
CatA#copy run start

Destination filename [startup-config]?
Building configuration...
[OK]
関連記事 - More from my site -
 RTX1200+SWX2200 VLAN双方向フィルター設定
 ファイルディスクリプタ メモ
 WHERE句なしのUPDATE
 cp 日付を加えて複製する 【Linux Mac】
 シャーディング メモ
 Laravel Failed to clear cache. Make sure you have the appropriate permissions
 GitHubのメールアドレスを匿名設定
 MySQLTuner CentOS7
 Let’s EncryptでSSL証明書 Nginx
 TeamViewer11 + CentOS7
 Composer インストール PHP
 Mac VSCode phpcs PSR2コード規約
 Shellshock
 Google Analytics 操作フロー